
If you’re showing film clips in class, you’ll probably want to make a DVD clip reel — your own DVD with the clips you want preloaded on it. That way you can avoid the frenzied scan through chapter titles and the awkward dead time while you wait for the menu sequence to load. And making a clip reel is easier than you think.
(If you’d like, you can download a PDF manual of this guide.)
As I’ve said, I believe — as does the Society for Cinema and Media Studies — that clip reels for the purpose of in-classroom teaching constitute fair use of copyright-protected material. But, of course, you should use your own judgment.
The instructions that follow are for Macs and some of the steps make use of software that isn’t free (but is inexpensive). I’ve tried, however, to include links to Windows and free versions of this software.
There are really three main steps to making a clip reel: ripping the original DVD, in which you transfer the DVD contents to your computer; editing the video into the clips you want; and burning your own DVD.
Here’s what you need:
1. Software that can rip a DVD. I use HandBrake, which is free and easy to use. There are versions for both Windows and Mac PCs.
2. Software that can edit video. I use Quicktime Pro, an upgraded version of the Quicktime you get for free. It costs $29.99, but it’s a dead-simple, lightweight tool that can also, incidentally, convert videos for viewing on an iPod or iPhone. Other options: Windows Movie Maker (free), Free Video Converter (free, Windows), iMovie ($79, if it’s not already on your Mac).
3. Software that can burn a DVD and make a menu for it. I use iDVD because it’s easy and it came free on my Mac. Other good options: ImgBurn (free, Windows), BurnAware (free, Windows), Burn (free, Mac).
4. A source DVD (obviously!).
5. A DVD burner. If your computer doesn’t already have one, you can get one fairly inexpensively.
6. Enough hard drive space to hold your video. You might want to get an external hard drive if you’re going to work with a lot of video.
7. A blank DVD.
Okay! Let’s do it.
Step One: Open up HandBrake and click on your DVD.

Since you’re making a clip reel, you probably don’t want the entire movie copied onto your hard drive. So before you start ripping, look through the DVD and make a note of which chapters contain the clips you want. Later, we’ll chop up those chapters to include only the sequences you want to show your students.
Pop in the DVD. If it starts playing automatically, tell it to quit. Open up HandBrake and navigate to your DVD. You’ll see files inside the DVD, but don’t worry about those. Just click on the disc and then press “Open.”
Step Two: Tell HandBrake what you want
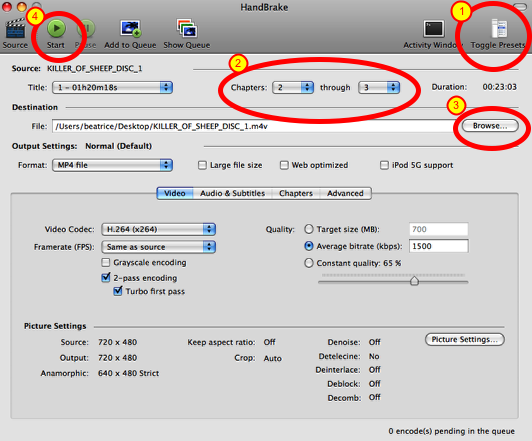
This step looks kind of scary, but it’s really not that bad.
1. Click on “Toggle Presets” in the upper right-hand side of the window to open up a list of output options (if it’s not open already). Select “Normal.” That sets all your output options. See, not so bad.
2. Near the top of the window, select the chapters that you want to copy from the dropdown menus.
3. Click “Browse” under the “Destination” heading to pick where you want your movie chapters to go.
4. Press “Start” at the top of the window. HandBrake will get to work. This may take a while.
When HandBrake is done, you can quit it.
Step Three: Choose your clip with QuickTime
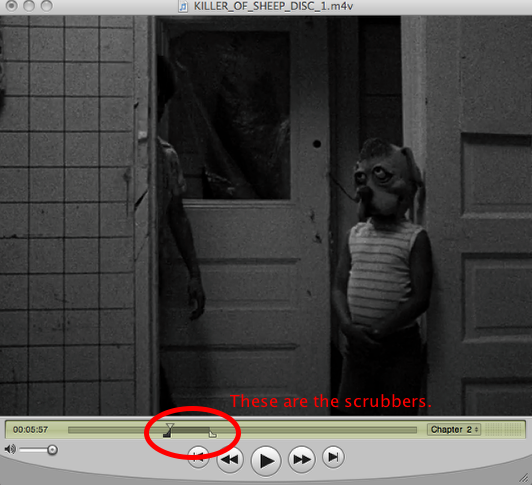
Navigate to the movie file HandBrake made for you and open it up with QuickTime Pro. Use the scrubbers at the bottom of the screen to trim the chapters into the short clips that you’d like on your clip reel.
Step Four: Trim to Selection
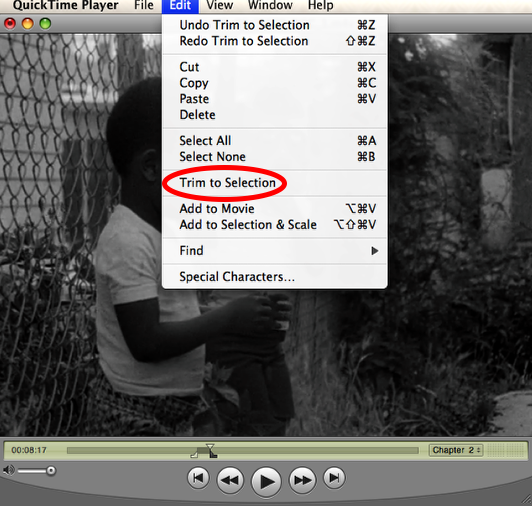
When you’re happy with the chunk of movie you’ve chosen, go to “Edit” and then pick “Trim to Selection.” If you have trouble getting to just the part you want, repeat this step with progressively smaller chunks. It will get easier to refine your selection if you have less film to work with.
If you want more than one clip from the chapters you’ve copied, go to “File,” then “Save as” and pick a descriptive name for your clip. Save it as “self-contained movie,” not a reference movie. Close that clip, open up the longer version, and repeat as many times as you want.
Step Five: Move your clips to your “Movies” folder

In step six, you’ll be using iDVD to burn a DVD of your clips. To make it really easy for iDVD to find your clips, it’s best to move them into the “Movies” folder, which should be under “Places” in your Finder window.
Step Six: Open up iDVD and create a new project

Close QuickTime and open up iDVD. Click on “Create a New Project” and, in the next pop-up window, give your DVD a name.
Step Seven: Pick a theme for your DVD menu

You’ll see the main iDVD window. You can decide how you want your menus to look by picking from a bunch of themes. Personally, I like to keep things as simple as possible — no sound, no flashing text, no extra images — so I tend to choose “Brushed Metal” under “Old Themes.” But, hey, if you want something fancy, go nuts.
Step Eight: Add your clips to your DVD

To tell iDVD which clips you want on your DVD, click on “Media” in the bottom left-hand portion of the window. Click on “Movies” and then select the “Movies” folder. Drag and drop your clips onto the surface of the DVD menu.
Step Nine: Make it look nice

Click on the DVD title to change the name of your DVD. The “Drop Zone” is a decorative feature that allows you to have a clip playing on your DVD menu. Drop a clip in the Drop Zone if you want this, or just leave it blank.
Step Ten: Burn your DVD!

Once you’re happy with the way your menu looks, click on the circle next to the Play button at the bottom of the window. For some reason, it now changes to a radioactive-looking symbol. IDVD will now ask you to insert a blank DVD, and then it will burn your clip reel for you.
Once this step is finished, you’re through! Congratulations, you have a clip reel.
2 responses to “How to make a DVD clip reel”
[…] you’re wondering how I got so fancy with my instructions on how to make a DVD clip reel, I had a trick up my sleeve. ScreenSteps is an application specifically designed to create software […]
[…] like to take advantage of these DMCA exemptions by making a clip reel, I’ve written a tutorial to help you do […]