Register

Register for the course site by going to http://miriamposner.com/classes/dh150w16/wp-admin/?action=register. Enter a username of your choice and your email address. It’s OK to use a pseudonym, but let me know what it is so that I can give you credit.
Log in

Check your email to find your username and temporary password. Click on the link to log in. Once you’re logged in, you should see your dashboard — the back end of our course site.
Start a post
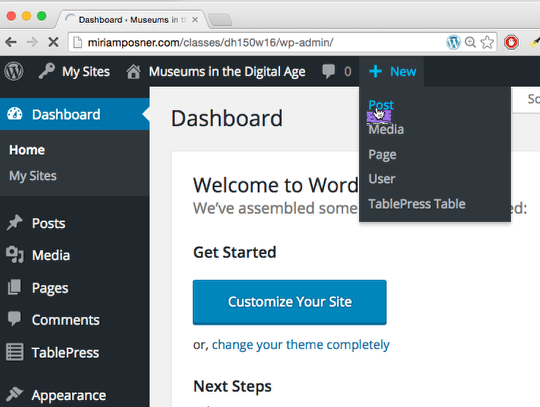
To begin a post click on New (at the top of the page) and then Post. (You may have fewer options than I do in this picture, since I’m an administrator.)
Begin composing your post.

You can begin writing your post much the way you would write a Word document. Because you’re composing on the Internet, you should save frequently so that your work doesn’t get lost if you lose your Internet connection.
Add an image (1)

You can add an image to your post by clicking on Add Media.
Add an image (2)

Upload an image by dragging onto the pop-up window. In the next window, you can change some settings until the image is the size and location that you prefer. You can also add a caption and “Alt Text,” where you can describe your image for the site-impaired. When you’re satisfied, click on Insert into post.
Add a link

To add a link to your post, highlight the words that you’d like to serve as links. Then click on the link icon in the text-editor. In the pop-up box that appears, enter the URL (the address) of the page you’d like to link to.
Hit Publish.

When you’re satisfied, click on the Publish button. (You can also hit Preview if you want to see how your post will look.)
Admire your work.

Nice job!