It’s pretty easy and fun to make a movie with iMovie, which is the video-editing software I suggest you use if you choose the digital storytelling option for your final assignment. Today, we’ll edit together photos, music, and text to make a very short story of an event in your life. Incidentally, you could also use video clips to build your movie, in much the same way you’ll use photos today.
Get ready (1)

It’s easier to use iMovie if you move all your photos into the Photos library. To do this, first download your photos from wherever they’re currently stored. Next, open Photos. (It should be in your Applications folder.) Now, drag your photos into your Photos library.
Get ready (2)
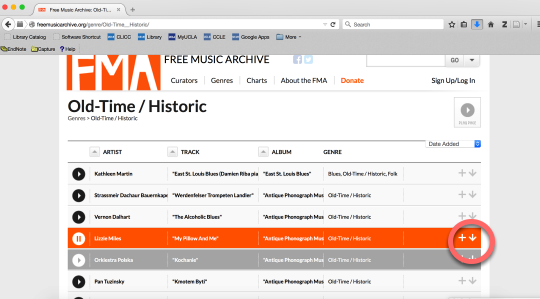
We’re going to add some music to our movie, so we need to pick a soundtrack! We want to look for Creative Commons-licensed songs; that is, songs that the creators have designated free to download and reuse. One good place to look for CC-licensed music is the Free Music Archive. Spend some time browsing the music there. Once you’ve found something you like, click on the arrow to download the song. It should save in iTunes, which is where you want the file to be.
Open iMovie

Now you’re ready to open iMovie! It will be in your Applications folder.
Create a new movie

Click on New Movie. On the next screen, pick No Theme. Themes can be kind of cool, but they also constrain your editing options, and we want to experiment with those options.
Start adding photos to your video

Here’s where you’ll do your editing. If you click on Photos Library on the left-hand side of the window, you should see your photos. The pane in the upper right-hand corner is where you’ll play your video in progress. And the bottom half of the window is where you’ll do your actual editing. The vertical white line in that bottom part of the window indicates where you are in your video’s playback. (Right now, of course, you don’t have a video, so there’s nothing to play.)
Try dragging your photos down to the bottom half of the screen, in the order that you want them to appear in your video.
Move photos around and change their duration

By default, iMovie plays your photos for 4 seconds. But you can change this by dragging the edge of your little photo-strip forward or backward. Notice that the total length of your movie changes as you do this.
Add some music

If you click on the Audio tab at the upper left of the iMovie window, you should see the song you downloaded in iTunes. Drag the song to the bottom half of the window, underneath the video you’re editing. It should drop into place to become your soundtrack.
Press play on the upper right-hand part of the window to see how your video looks and sounds now.
Add some titles

If you click on the Titles tab, you can see some options for titles. You can superimpose these over images (by slotting them above a video clip) or have them play by themselves. Change the text by double-clicking on the title.
Edit your images

By default, iMovie gives your photos a “Ken Burns effect,” zooming and panning over them to make them look more lively. If you don’t want this, or if you want to alter it, double-click on the image to change the settings.
Change your transitions

If you click on the Transitions tab, you’ll see some options for changing the way one image blends into the next. Drag a transition to the space between your image-clips in order to introduce a transition. Remember, the crazier your transition, the better your movie. (That’s a joke.)
Save and share your movie
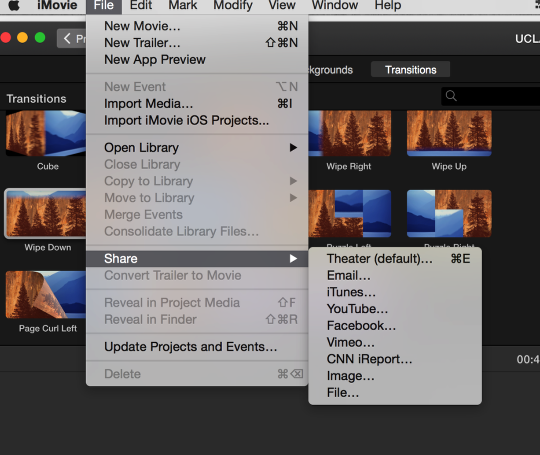
To save your video file, click on File and then Share. You’ll see that you can save your video in various ways. The most straightforward way is to save it as a file. Be sure to give the file time to finish downloading (it can take a few minutes), and unclick the Theater sharing checkbox — that’s an Apple thing that doesn’t really apply to you.
Upload your video (if you want)
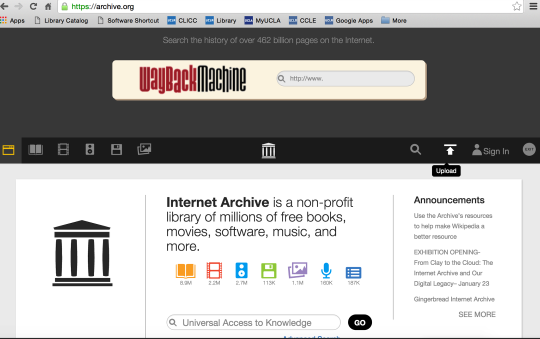
If you want to put your video somewher other people can see it, you’ll need to upload it to a video-streaming service, like YouTube or Vimeo. You can probably figure out how to do this yourself, but my favorite place to upload videos is the Internet Archive, since unlike some other options, it’s a nonprofit archive, not a for-profit business. It’s pretty easy to upload videos to the Internet Archive — just click on Upload, create an account, and upload your video.
Give your video a license
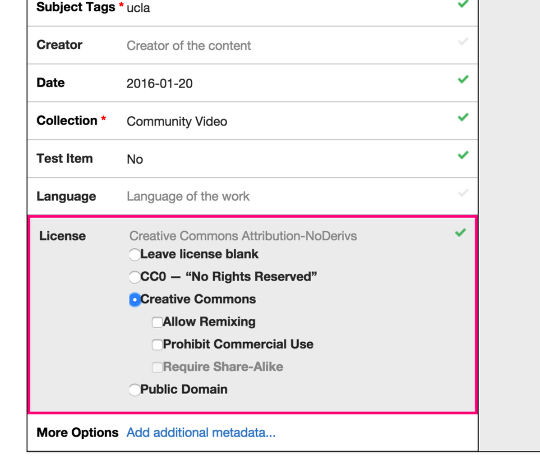
Now that you’re a filmmaker, you can give your video a Creative Commons license, too! That way other people can download and share it.