HTML is the language that web browsers (like Firefox, Chrome, and Safari) understand. It’s a markup language, meaning you annotate content with it so that the browser treats that content in different ways. (HTML stands for hypertext markup language, if you’re curious.)
It’s not too hard to learn, and it’s fun!
Get set up

In the Applications folder of your computer, double-click on the Sublime program to open it.
Sublime is a (free) text editor, which is the name for the kind of program that you type code into. Just like Microsoft Word, it displays the text that you type. But unlike Microsoft Word, it doesn’t (invisibly) surround your text with formatting information. So never use Microsoft Word for your code! Instead, use Sublime or one of the many alternatives, like Atom.
Believe it or not, a plain text editor (like Sublime) and a web browser (like Chrome, Safari, or Firefox) are all you need to build even the fanciest webpage!
Enter the document declaration and a little bit of text

A document declaration gives instructions to the web browser (like Safari or Firefox) for how to handle the document you’ve created. Luckily, they’re easy to make. Just type
<!DOCTYPE html>
at the very top of the document.
Then press return and type in
<html>
to tell the browser to expect HTML in the document that follows. Then skip a few lines and close your html tag by typing
</html>
(Your browser doesn’t care about spaces and returns that aren’t inside HTML tags.)
It’s considered good practice to divide up your webpage into head and body sections. Special instructions for the browser (if you have any) go in the head section. Content goes in the body section.
To make these sections, press return and enter
<head>
somewhere inside your opening and closing <html> tags.
After you create your head tag, leave a line or two blank and close your head tag by typing
</head>
Now make the body section. Below your <head> tag, type
<body>
Then skip a few lines and type
</body>
Let’s put some text in, too, so we have something to look at. Type
<p>Welcome to my webpage</p>
after your opening body tag and before the closing body tag. Perhaps you remember what <p> stands for: paragraph
Save your document as index.html.
Leave your document open and navigate to where you saved the file. Double-click the icon for the file you saved. By default, that file should open up in a browser. Now you’ve opened the file in two different ways: as a webpage and as a text file. Arrange your windows so you can see the document open as a text document and as a webpage, simultaneously.
On your text document, alter the text between the paragraph tags so that it says something different and save the document. Now click Refresh on your web browser. The text on the webpage should show the new text you’ve saved.
Add a header

By default, headers instruct browsers to treat text inside differently, to signal that it’s important. Add a header to your page by putting some text in
<h1>
tags, somewhere above your paragraph tags. Save the document and refresh your browser. You should now have a header on your page! Looking good.
You can also use
<h2>
tags, which are a bit smaller, and
<h3>
tags, which are smaller still, all the way to
<h5>
tags. Experiment with different-sized headers, saving and refreshing as you go.
How links work
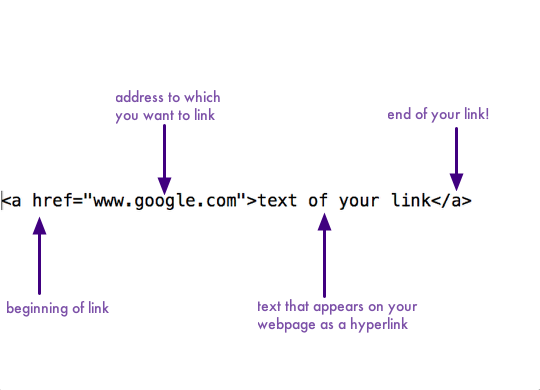
What’s a webpage without a link? They work like this:
<a href=”www.google.com”>text of your link</a>
In the example above, www.google.com is the URL to which you want to link and text of your link is the text that actually appears as a hyperlink.
Create a link on your page

Try it yourself by creating a new paragraph (using the opening and closing <p> tags) and creating a link in your new paragraph. Save your document, refresh your browser and test your link!
How images work
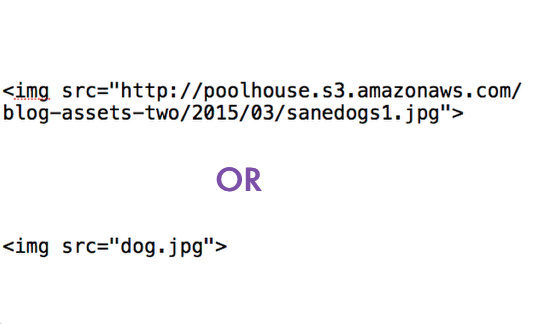
You can link to an image in one of two ways. If there’s an image out there on the Web that you’d like to embed on your page, you can grab the link to the image by right-clicking on the image and clicking Copy Image URL. Then you can embed the image by pasting the link, as above.
If you have an image on your computer that you’d like to use, you can save it at the same place where your html file is saved and link directly to it by entering the file name, as above.
Add an image

Add an image to your webpage using one of the two methods from the previous step.
Add some emphasis
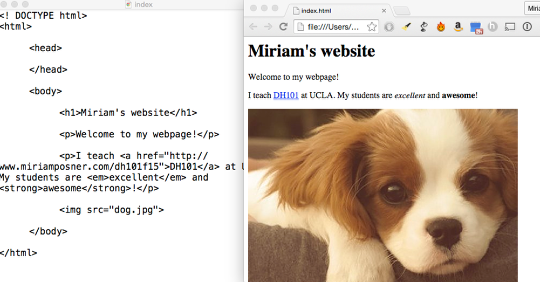
Sometimes you want to highlight particular text on your page, to indicate that the browser should treat it differently. Common tags for this are
<em>
(which stands for emphasis; by default, your browser will italicize the text inside this tag) and
<strong>
(by default, your browser will bold the text inside this tag).
Create more text and experiment with emphasis and headers. Just remember to always close those tags!
But wait! No one can see your page!
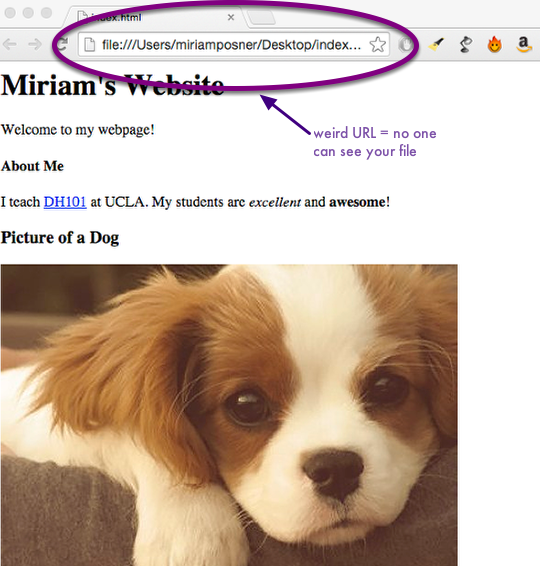
If you look closely at the URL on your webpage, you’ll see that it looks funny: it starts with
file:///
not
http://
That’s because you’re working on your file locally, meaning just on your own computer. No one else can see your webpage at the moment.
In order for other people to see your file, it has to be hosted on a server, meaning moved to a special computer whose job is to broadcast files to the internet. You don’t have a server yet, but you will on Friday. Francesca will show you how to purchase server space and move your file to a server.
For now, though, you did it! You built a webpage! It’s still not very pretty, though. Let’s decorate it in the next tutorial!